This post will discuss Android Activities and how the OS manages them.
Activities
An activity is an instance of the Activity class and is responsible for managing user interactions with a screen of information. Inside an activity are widgets: which can show text, graphics, interact with user, or arrange other widgets on screen. Also includes buttons, text input, and check boxes.
<LinearLayout xmlns:android="http://schemas.android.com/apk/res/android"
              android:orientation="vertical">
    <TextView
        android:text="@string/sample_title_label" />
    <Button
        android:id="@+id/sample_button" />
</LinearLayout>
LinearLayout, TextView, and Button are all widgets that an activity is responisble for managing.
Activity Lifecycle
Upon initially starting the application, the ActivityManager calls the onCreate() method on our activity, followed by onStart(), and then onResume() to gives us our running activity. If we have another activity created, ActivityManager calls the onPause() method for our current activity, but will resume with onResume() once this activity returns to the foreground. onStop() occurs when we hit home during the use of our application, if we return, our applicaiton will start up where we initially left. However, the OS can determine that it needs additional resources and can kill these processes on a need be basis. And these activities will execute onDestroy() when we are finished with the current activity. Home button will cause the activity to execute onPause() and onStop(). Using the back button will also call onDestroy() which will also destroy any stashed state.
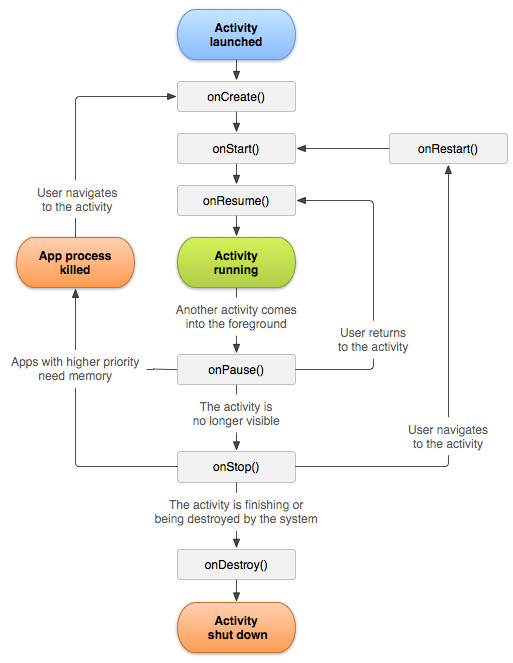
Rotating the screen to change its orientation will cause it to change the device configuration, which calls onDestroy() and onCreate() in order to inflate the new activity with the device configuration.
Saving State
To persist our data upon changing the device configuration, we will use protected void onSaveInstanceState(Bundle outState) method. This method is called by the system before onPause(), onStop(), and onDestroy. And requires the data passed in as as a Bundle object.
private static final String KEY_INDEX = "index";
@Override
public void onSaveInstanceState(Bundle savedInstanceState) {
  super.onSaveInstanceState(savedInstanceState);
  savedInstanceState.putInt(KEY_INDEX, mCurrentIndex);
}
Starting an activity
We can start an activity by using the startActivity(intent) method. This sends a call to a part of the OS called the ActivityManager, which creates Activity instances and calls onCreate(). An intent is an object that the component can use to communicate with the OS. Components are activities, services, broadcast recievers, and content providers.
| Constructor | Description |
|---|---|
| Intent() | Create an empty intent. |
| Intent(Intent o) | Copy constructor. |
| Intent(String action) | Create an intent with a given action. |
| Intent(String action, Uri uri) | Create an intent with a given action and for a given data url. |
| Intent(Context packageContext, Class cls) | Create an intent for a specific component. |
| Intent(String action, Uri uri, Context packageContext, Class cls) | Create an intent for a specific component with a specified action and data. |
The Intent class specifies which activity the ActivityManager class should start. Our below example uses the Intent(Context packageContext, Class cls) contructor. Context tells which package the class object can be found in, and Class is what we want to start. We can add additional information to the intent by calling public Intent putExtra(String name, boolean value), this allows us to pass information between our current activity and the one will will be creating.
// MainActivity.java
Intent i = new Intent(MainActivity.this, SideActivity.class);
i.putExtra(SideActivity.MY_EXTRA_VALUE, myValue);
startActivity(i);
// SideActivity.java
public static final String MY_EXTRA_VALUE = "net.ShawnKlein.testapp";
mMyValue = getIntent().getBooleanExtra(MY_EXTRA_VALUE, false);
With the above code, the ActivityManager will check the package's manifest for a declaration with the same name as the specified class. If no declaration is found, it will respond with a ActivityNotFoundException. We call Activity.getIntent() to return the intent that started this activity and getBooleanExtra(String name, boolean defaultValue) to pull the information out of the intent. It is also important to note that we should define keys for extras on the activities that retrieve and use them, we do this with public static final String MY_EXTRA_VALUE = "net.ShawnKlein.testapp";.
For our child activity to return data back to our main activity, we will use startActivityForResult(Intent intent, int requestCode) instead of startActivity(i) and onActivityResult(int requestCode, int resultCode, Intent data) to actually retrive the returning data. The Child activity will use setResult(int resultCode) or setResult(int resultCode, Intent data), if no result code is set, and the parent expects a return, the OS will send RESULT_CANCELED as the resultCode.
// SideActivity.java
public static final String RETURNING_DATA =
    "net.shawnklein.testapp.data_result"
private void setReturningDataResult(boolen myValue) {
    Intent data = new Intent();
    data.putExtra(RETURNING_DATA, myValue);
    setResult(RESULT_OK, data);
}
// MainActivity.java
@Override
protected void onActivityResult(int requestCode, int resultCode, Intent data) {
    myVariable = data.getBooleanExtra(Sideactivity.RETURNING_DATA, false);
}
To retrieve our returing data, we use protected void onActivityResult(). This is part of the Activity class. The ActivityManager calls onActivityResult on the parent activity after the child activity dies. This also works for parent fragments, the intent from the child fragment wil be returned to the parent fragment.
Fragments
A fragment is a controller object that an activity can deputize to perform tasks, such as managing a user interface. A UI fragment as in either the entire screen or only part of it. Using UI fragments has the benefit of a more modular interface. One where you can remove a fragment and easily replace it with another for a different function or view. Fragments are not able to get on the view by themselves, their host must define a spot in it's layout for the fragment, and manage the lifecycle of the fragment instance.
To use a fragment in an activity, we must define a space for our fragment to be used in our 'xml' file. While our example is for a single fragment, and activity cn define multiple container views, as well as widgets of it's own. Our fragment would be defined as normal.
// activity_main.xml
<?xml version="1.0" encoding="utf-8"?>
<FrameLayout xmlns:android="http://schemas.android.com/apk/res/android"
android:id="@+id/fragmentContainer"
android:layout_width="match_parent"
android:layout_height="match_parent"
/>
To set our controller to use a fragment, we replace Activity with FragmentActivity. Then we make a call to set up the FragmentManager using getSuportFragmentManager(). The FragmentManager handles a list of fragments and a back stack of fragment transactions. We ask FragmentManager for fragment, if in list, FragmentManager will return it. If null, a new CrimeFragment will be created.
// TestActivity.java
public class TestActivity extends FragmentActivity {
  @Override
  protected void onCreate(Bundle savedInstanceState) {
    FragmentManager fm = getSupportFragmentManager();
    Fragment fragment = fm.findFragmentById(R.id.fragmentContainer);
    if (fragment == null) {
      fragment = new TestFragment();
      fragment.beginTransaction().add(R.id.fragmentContainer, fragment).commit();
    }
  }
}
We create a fragment transaction with FragmentManager.beginTransaction(), it returns an instance of FragmentTransaction, which we use to add, remove, attach, detach, or replace fragments in the fragment list. They are the heart of how we use fragments to compose and recompose screens at runtime. The add() method takes 2 parameters, the container view ID and our fragment. The container view ID tells the FragmentManager where the fragment view should appear and is its unique identifier in the FragmentManager's list.
Its good to note that the FragmentManager saves out its list when the Activity is destroyed. When a new Activity and FragmentManager is created, it retrieves the list to make things the way they were before. If no fragment is given, fragment will equal null and a new fragment is created.
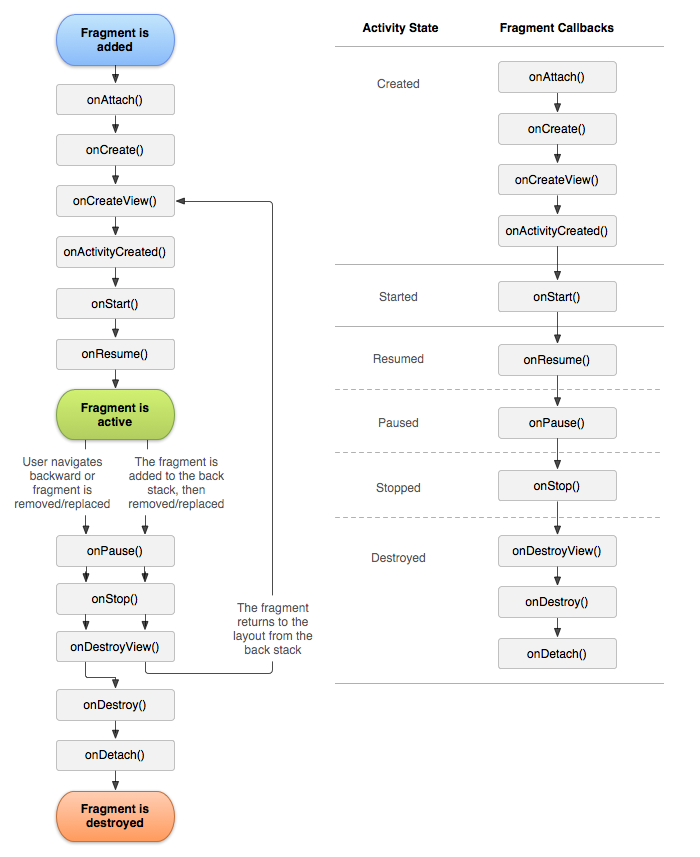
Our fragment class does not inflate using the onCreate() such as activity would, it inflates using the onCreateView() method. and we explicitly inflate the the fragments view by calling LayoutInflater.inflate(). The first parameter is the resource ID, second is the parent's view, and third tells the inflater whether to add the inflated view to the parent.
// TestFragment.java
public class TestFragment extends Fragment {
  @Override
  public void onCreate(Bundle savedInstanceState) {
    super.onCreate(savedInstanceState);
  }
  @Override
  public View onCreateView(LayoutInflater inflater, ViewGroup parent, Bundle savedInstanceState) {
    View v inflater.inflate(R.layout.fragment_test, parent, false);
    return v;
  }
}
The FragmentManager
The FragmentManager is responsible for calling the lifecycle methods on the fragments in its list. The onAttach(), onCreate(), and onCreateView() methods are called when you add the fragment to the FragmentManager, onActivityCreated() is called after the hosting activity's onCreate(). If the Fragment is added when the Activity is already running, paused, or stopped, the FragmentManager runs through each method until it get gets caught up to the Activity's state.
If we were to persist a fragment, the ActivityManager will check the setRestainInstance boolean, if set to true, the fragment will not be destroyed, but will be detached, then attached to the new FragmentManger and View.
@Override
public void onCreate(Bundle savedInstanceState) {
    super.onCreate(savedInstanceState);
    setRetainInstance(true);
}
Now that we have created our fragment, we need 2 things to host a UI fragment, a spot in the layout for the fragment's view, and manage the lifecycle of the fragment. Fragments lifecycle are called by the hosting activity, instead of the OS. You can add a fragment to either the hosting activity's layout or code.
| Layout | A layout fragment is simple, but inflexable. We hard code the fragment and its view to the activity's view and cannot swap out the fragment during the activity's lifetime. |
|---|---|
| Code | A code fragment gives us more control of how our fragment will interact with our activity. It will allow us to determine when to add the fragment to the host activity, remove it, replace it with another, and add the initial fragment back again. |
Fragments also have some convenience methods such as getActivity() which returns the hosting activity
Fragment Arguments
There is a chortcut approach for a fragment to retrieve needed information from its calling activity. We call getActivity() to get the frament's calling activity, getIntent() will return the Intent that was initially used to to start the BookActivity, from that Intent object we will call getSerializableExtra(String) to pull the UUID into a variable.
// BookFragment.java
public static final String EXTRA_BOOK_ID = "net.shawnklein.android.availablebooks.book_id"
public void onCreate(Bundle savedInstanceState) {
  UUID bookId = (UUID)getActivity().getIntent().getSerializableExtra(EXTRA_BOOK_ID);
  mBook = Library.get(getActivity()).getBook(bookId);
}
Now that we have the Book, we can display its data.
public View onCreateView(LayoutInflater, ViewGroup, Bundle) {
  ...
  mTitleField = (EditText)v.findViewById(R.id.book_title);
  mTitleField.setText(mBook.getTitle());
}
The drawback with this simple approach is we lose encapsulation. BookFragment is not longer a resuable building block as it now expects to be hosted by an activity whose Intent defines and extra named EXTRA_BOOK_ID.
A better approach is to use the Bundle object that is attached to it. The bundle uses key-value pairs just like intent extras of an Activity.
// BookFragment.java
public static BookFragment newInstance(UUID bookId) {
  Bundle args = new Bundle();
  args.putSerializable(EXTRA_MY_OBJECT, bookId);
  args.putInt(EXTRA_MY_INT, myInt);
  ars.putCharSequence(EXTRA_MY_STRING, myString);

  BookFragment fragment = new BookFragment();
  fragment.setArguments(args);

  return fragment
}

// BookActivity.java
protected Fragment createFragment() {
  UUID bookId = (UUID)getIntent().getSerializableExtra(BookFragment.EXTRA_BOOK_ID);

  return BookFragment.newInstance(bookId);
}
We are calling setArgument(Bundle) on an object that has inherited from the Fragment class. This method name of newInstance() follows Android's naming convention. To get the arguments, we call getArguments() from Fragment, then the type specific 'get' method from Bundle.
// BookFragment.java
public void onCreate(Bundle savedInstanceState) {
  UUID bookId = (UUID)getArguments().getSerializable(EXTRA_BOOK_ID);
  mBook = Library.get(getActivity()).getBook(bookId);
}
Updating Inflated Activity
We may have an Activity that we already inflatedand is still in our stack, but the data changed due to current running activity changing the data. In this case, must change that parent activity to update its view list.
public void onResume() {
  super.onResume();
  ((BookAdapter)getListAdapter()).notifyDataSetChanged();
}